FrontSproketCoverRemoval
(For Google purposes: "GS500 Front Sprocket Cover Removal")
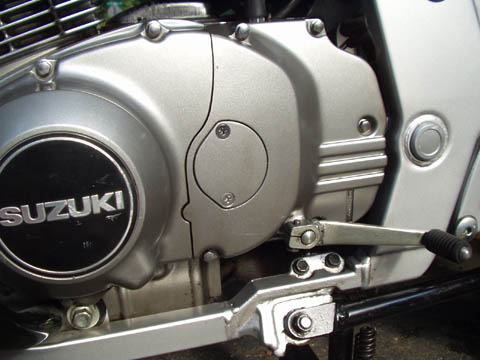
Here's what it looked like before opening. The shift lever is the first bit to remove. Requires a 10 mm wrench to remove the bolt holding it to the spline. Mark the split with a permanent marker to indicate alignment when it goes back on:

Before the drive sprocket cover comes off, (You MAY, or may not, need to) loosen the in-line Clutch tension adjustment, if you are going to play with the internal clutch mechanisms.
 This is a two step process. What you want to do is move the "long silver thing" INTO the housing.
 However, you need to loosen the lock nut first.
 (It's just like the adjuster thing at your handlebar clutch lever, except longer)

 step 1: Loosen the lock nut with a 12mm wrench, moving it up to the 10mm clutch adjuster.

 step 2: Turn the clutch adjuster clockwise, releasing tension to the clutch mechanism. This moves it "into" the housing.
 The clutch lever (handlebar) will go limp.  Once done, the in-line adjuster looked like this:

Now back to getting the sprocket cover off.
The five screws holding the drive sprocket cover are next, taking an 8mm socket. Three are long -- two short. Remember how they come off.
Wiggling the cover off, the drive sprocket itself sees daylight:

There's this rod sticking out to the left of the sprocket, the clutch push rod. The pushing comes from a Clutch push mechanism on the inside of the drive sprocket cover:

Intrigued as I am with taking things apart, I needed to know how this worked. The push rod was not easy to push in, but it came out very easily. I pushed it back in and left it there for the duration.
Looking at the cover insides, the spring pulls the cable down and screw mechanism closed:

Pulling the cable against the spring, the clutch mechanism begins to screw out, perhaps 2-3mm, pushing against that rod sticking into the transmission:

Amazed that this is all it takes, I set to work adjusting the three pieces -- Clutch Lever, the In-line Clutch adjustment, and the yet to be revealed Clutch Mechanism Adjustment screw. As mentioned, the Clutch Lever is now limp:

I have a lot of adjustment room here, and leave it. If I was reasonable well extended, I would have pulled some slack adjustment in toward the handle.
Okay, I put a dab of grease on the push rod and the shaft of the shifter rod and bolted the sprocket cover back on. I decide to set the middle adjustment first. Picked a reasonable distance for the adjuster to be positioned away from the cover's edge (6-8mm) and locked it in:

With the drive sprocket cover back on, I take the two screws off to reveal the Clutch Mechanism Release Adjustment screw and 10mm lock nut. Released the nut and backed off the screw until there was no resistance. Then turned the screw in until I met resistance. This is the point at which the push rod begins to compress the cluch mechanism I backed off a quarter-turn and locked it in.

I didn't back off enough. Should have been more as the clutch lever was too tight, barely moving with tension on the lever:

Smal matter. With the lever adjuster, I dialed in a 4mm free-play in the lever before pulling in the clutch:

I locked in the lever-end and put the rubber boot over the clutch lever adjuster. Checked the drive sprocket cover bolts and re-installed the gear shift lever:

All done. Went for a ride to ensure all operated as it should. Job took about 20 minutes once I figured out the three degrees of adjustment freedom, not counting the 30 minutes of cleaning oily, waxy, sunflower seed-laden goop from the insides of the drive sprocket area. Add 10 minutes if you want to play with it some before buttoning up. All told, it took me an hour.
Equipment included paper towels, rags, WD-40 to liquify crud, a slotted head screwdriver, 8mm & 10mm sockets, 8mm, 10mm & 12mm wrenches & shop gloves. Takes only common sense to do this, but reading a Clymer manual helps set the stage for what you'll be doing.
Hope this is useful to some of you budding wrenchers of GS500 technology. Piece of cake, especially after you've done it once. Thumbsup
Roy...
PS. I'm not a professional. Follow these directions at your own risk.
( Thanks Roy. Great pix. FYI for those people who like video though, http://www.youtube.com/watch?v=UGqUlKGby5U is also available )
