ChangeOil
Suzuki recommends that you replace the oil and oil filter every 4000 miles. If you ride in dirtier environments you may want to perform this process more regularly. It is also a good idea to check your oil level on a regular basis to be sure it doesn't drop too low.
Proper proceedure to check oil level,can be found on the EngineOil page.
Written details below. Or if you prefer, youtube video with extra verbal details (14min)
Necessary Supplies
- Fresh oil. Your options here are extensive but 10W40 is the most popular choice and is recommended by Suzuki for most temperature ranges. Be sure not to buy oil with the Molybdenum additive, it reduces friction in cars but can cause your clutch plates to slip. Suzuki OEM bike engine oil is always a safe bet. * Engine Oil Explained - Information to help you understand the importance of oil to your GS500.
- Oil filter and the O-ring.
The O-ring is a rubber gasket between the engine case and the filter cover. It isnt really a "ring", per say: more like an odd wavy cloud shape that is roughly circular.
(it is #8 on this diagram). You may not need the O-ring for every filter change. If the original one is not damaged you can safely reuse it. Most aftermarket oil filters come with O-ring.
- OEM part numbers:
Suzuki filter 16510-45040, Suzuki O-ring 16518-4500. Yes, you buy the OEM O-ring separately. - Aftermarket part numbers:
STP SMO-00
FRAM CH6000
Purolator ML16800
Wix 24931
Hi Flo HF133
NAPA PS4931
Most of these come with an O-ring. Double check when ordering. Out of all those HiFlo is regarded one of the better, FRAM/STP filters have mixed opinions, more on the low side ("Apparently FRAM filters are held together with cardboard end-pieces on the filter element, when most other decent ones are held together with metal"). When buying at the store check the stamp on the filter itself. Some folks reported mismatching labeling on boxes and filters.
- OEM part numbers:
- Oil catching pan. This shouldn't cost more than a few dollars at any auto parts store or Walmart. Try to find one with a spout to aid pouring the old oil into another container later for transport to a recycling facility or auto parts store.
- 10mm hex wrench for removing oil filter (if desired).
- 21mm wrench for removing drain bolt (at least some GS500Fs are known to use a 17mm hex instead, check beforehand if you have a newer bike). Because of the design of the crankshaft case it is highly recommended that this be a socket wrench since it is very difficult to get a straight wrench onto the bolt.
- Optionally, thick garden/construction/leather/etc. gloves to protect hands from coming into contact with hot exhaust pipes. Even a momentary touch of surfaces heated to about 1200F is going to HURT! Also the waste oil will be hot, use caution. A pair of thin latex gloves is always a good idea for protection while working on a motorcyle, esp. with chemicals like oil, electrolyte, etc.
Old Stuff Out
- Run engine for 5 minutes to warm up the oil
- Place bike on centerstand
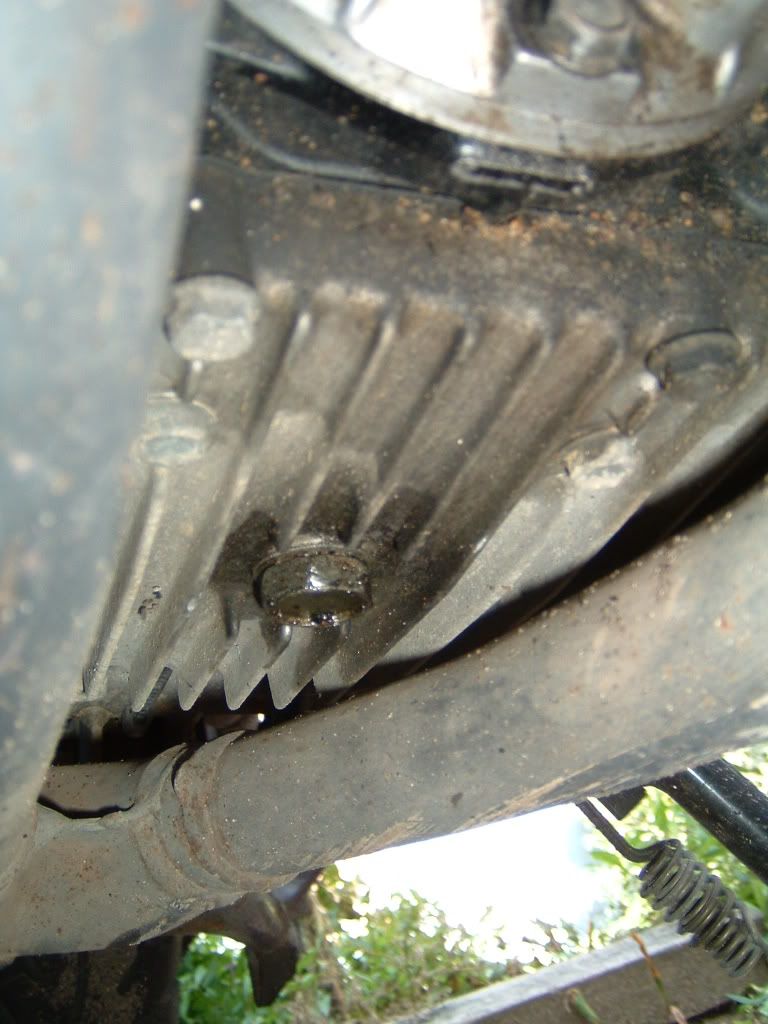
- Place oil pan under drain bolt. Drain bolt is on the bottom of the engine, between the two exhaust pipes. See picture below.

- Use 21mm socket wrench to remove the oil drain bolt (caution, exhaust pipes will be HOT!). The GS500F may have a 17mm oil drain bolt.
- Allow all the oil to flow into the oil pan. Loosen the oil filler cap to increase the speed of oil flow.
- At this point it's a good idea to wait for about 20-30 minutes. First to allow most old oil out, but more importantly to allow the exhaust pipes to cool to the safe levels so you won't burn yourself later.
Replacing the Oil Filter
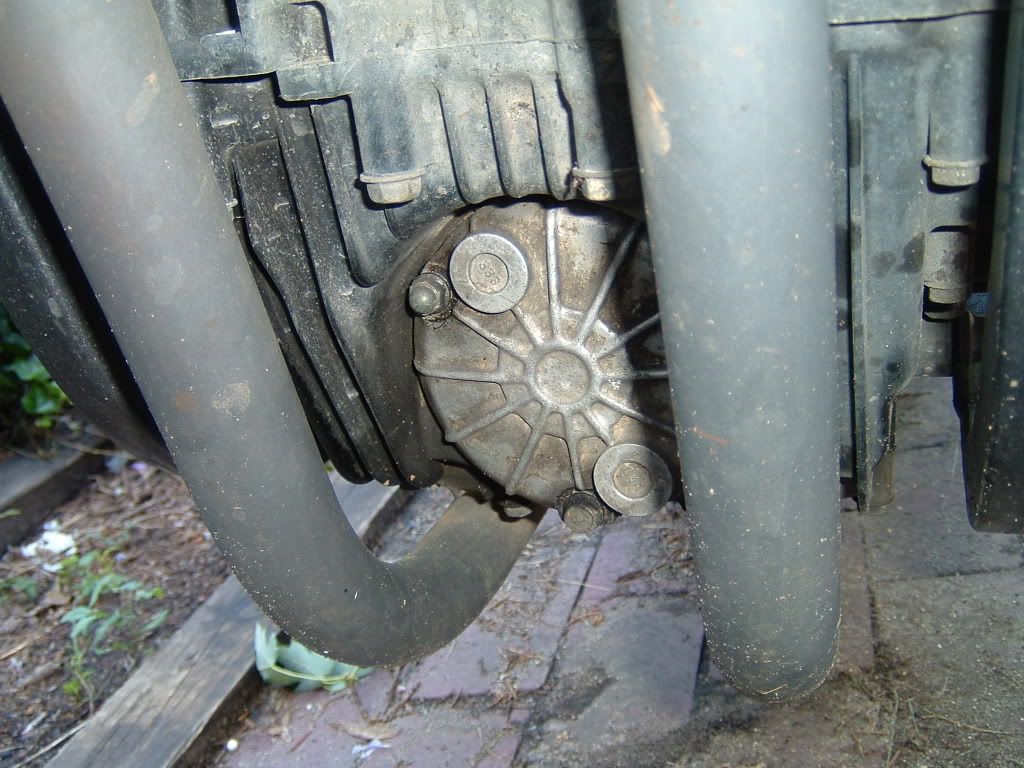
- Loosen and remove the oil filter cover (some more old oil will splash out, beware). This is found on the front of the engine between the exhaust outlets (see below). The 3 bolts holding it on should be loosened with a 10mm hex wrench.

- Allow oil to drain from filter as much as possible. Don't loose the spring between the oil filter and the cover.
- Pull filter straight out and place into plastic bag for disposal.
- If necessary replace the O ring in the cover groove. Oil it with some fresh motor oil.
- Place the new oil filter with the opening facing the engine. Put the spring between the cover and the new filter.
- Place cover over the oil filter and retighten 10mm bolts. Torgue is not specified anywhere but for this size of bolts it should be 5-8lbs
Note: Be careful when tightening the acorn nuts that secure the oil filter cover as they have a tendency to strip the studs. Tighten them evenly in a circular pattern.
Note 2: If you do manage to strip or break the studs, you can find replacements at home depot in the hardware section. I used some set screws that were attached to a plastic knob. $.50/each and perfect fit. In comparison, the "cap nuts" are metric #6. Also to be found at home depot.
New Stuff In
- Before reinstalling the drain bolt check the drain bolt washer, you may need a new one (or it'll leak no matter how tight the bolt is). They call it a GASKET, part number 09168-14004, item #5 here. Cost around 90 cents. The washer is flat on one side and coned on another. The cone goes towards the engine. When you tighten the bolt the washer compresses, creating a tight seal.
- Dispose of old oil at a recycling center or auto parts store.
- Pour new oil into the filling hole. If the filter was replaced, slightly more than 3 quarts of oil should be needed (mine needed exactly 3 liters). Check the oil level frequently and be sure not to overfill (To properly read the level follow this procedure: pull the dipstick, wipe it and put it into the hole but don't screw it in, remove, read the level.)
- Replace oil fill cap and allow engine to run for a couple of minutes.
- Recheck oil level and add more if necessary.
- Optionally make a record on mileage and date of the oil cahnge in your maintenance log. You do have one, don't you?
- Removal of old crush washer: Grab the old crush washer using a pair of channel lock pliers, and hold the bolt with a wrench. Twist off.
- Alternative removal of old crush washer. Use a cold chisel and gently tap it down using a hammer on the aluminum washer at the 12:00, 3:00, 6:00 and 9:00 position. Tap hard enough to go through the aluminum, but not hard enough to damage the bolt.
- If you have a fairing, use a socket set with two extenders - it will make it easy to reach inside the fairing to loosen the filter cover.
After all this you should be good to go. Good luck!
